Time for round two.
It's taken some high and mighty time for me to do this. Blame it on being alternatively focused on my ongoing New World of Darkness chronicle (now featuring: Magi!) and a project to build an Android app for running said chronicle.
But the Zone beckons... How many of you fellow Stalkers have had dreams about it?
Again, I digress. Let's get started, shall we?
My previous (and first) post saw me undergoing all the steps to get the level editor up and running with all the Call of Chernobyl assets, so we're starting from there.
So, how do you use this thing?
Empty editor window. Funny. I'm not going to get much modding done this way.
I figure, we have to load up something to edit in the first place.
(While I'm taking screenshots, Yuki Kajiura's Terror Adherens comes up randomly on my playlist. Foretelling how badly I'm going to screw up, perhaps?)
To load a map, look up the 'File' label on the right-side panel, left-click on it, and an unfolding menu should appear. Then, left click on the 'Open' label.
 |
| Just so. |
This spawns your run-of-the-mill Open File dialog. In my case, I went looking for the stuff in the editors -> rawdata -> levels folder.
 |
| "Dat 'dialog' fing oughta look like dis 'un, boss." |
(I just spent 10 minutes trying to figure out how to type these stupid arrow characters in Unicode and realized I have to reboot my PC. Screw it. Goddamn Microsoft, if it wasn't for the games I'd have migrated to Linux or OS X ages ago.)
As you have noticed, I went and picked '01_escape' as our level, which is the file for the Cordon.
So, barring something unexpected happening (and doesn't it ever) after you load the file you should get this. (I got an error of some sort right before it finished loading, but I just clicked 'continue', and indeed it continued.)
 |
| "Um, yeah, dat's how one o' dem 'anomaly' gubbinz be lookin' like, boss." |
Ooooookay... this looks nice... but what do I do now? This is nothing at all like Android Studio.
Time to RTFM.
And the manual in question, or the beginning of it at least, is available at the Wormwood development team page over at moddb.com.
(Now miss Kajiura graces my ears with Salve, terrae magicae. Fitting. And ironic, considering how similarly horrible the world of the Puella Magi and their witch enemies is in regards to the Zone.)
Those guys are skilled through and through. They really put together a gorgeous tutorial, nothing like this learning journal of sorts.
Okay. Number 1, what is it. Already talked this one through.
Number 2, download and setup. Already talked this one one through, too.
Number 3, setting up the level converter. Ditto.
Number 4, using the level converter... actually this is talking about something different. Nope, we didn't set up the level converter after all.
I don't even have it. Gorgeous. Well, this is easily remedied.
Okay... whoa, this stuff is ancient. It hearkens back to the prehistoric days of 2011.
Unpacked it... this is actually pretty small stuff. And this is apparently limited to CoP levels only. Limited in scope, this. So I skip it.
On to step 5: The Level Editor.
Now this is the first juicy bit: how do we move about.
Quoting verbatim:
- Shift-LMB combined with mouse movement will move the view forward, backward, left, right etc.
- Shift-RMB combined with mouse movement will move the view up and down vertically.
- Shift-LMB+RMB combined with mouse movement will change the view as if you were in an FPS, allowing you to look around.
Now, occasionally, doing this will spawn a small dialog window in this fashion. Don't let it scare you. To avoid it, simply keep your POV in a look-down perspective. Turning the screen around to look at the horizon stands a greater chance of causing this.
 |
| "Boss! Dis be lookin' all red'" "Red? Good! Red wunz go fasta!" |
(The Random Number God decides to feature ClariS' Luminous. Hail Madokami.)
Okay now. Loading Maps... well, I just did this. Moving on.
Whoa, now this is interesting. Editing maps.
 |
| "Wot da zog be dem gubbinz?" |
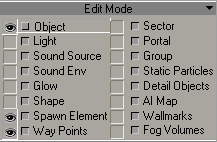
This little window is featured on the middle-right of the screen. Lots of strange things here.
These thingies let you pick what you want to see at any given moment.
The eye icons to the left of each selection show (drums roll) the visible components of the map. So I guess when these eyes aren't there, I can't see those parts. Wow.
By default my own editor had everything turned on, so I go ahead and turn off the stuff that is listed as off in this window. Most noticeable is the change effected by turning off the AI map: all those 4-arrow icons vanish. I suspect they denote areas through which the AI may move. (Astounding discovery, that. My genius is unmatched.)
 |
| Sure thing. |
Actually there is a pretty slick feature here: immediately next to the 'eye' checkbox, we have another, smaller checkbox, which has to be ticked in order for us to edit components of that kind. This prevents accidentally screwing up.
Which means, my chances of success just skyrocketed.
(Hey, a proper stalker's song for a change! Kino's Spokoynaya Noch. Tsoi lives!)
Okay... this dude gives a brief rundown of the important things you can actually see or edit here. Again, I quote:
- Objects. Most stuff. Landscape, buildings, etc. They are all large models that combine together. Like large jigsaw pieces after a fashion. Turning this on will let you select them. Also used to add or edit smaller objects on the level. The dude who wrote this mentions vehicles as an example.
- Spawn Element. Everything from items in the level to smart terrains. Things spawned into the game come under this, so you can add or edit stuff on the level such as:
- Small items ("Anuvver gun fer yer pile, boss!")
- Anomalies (one of my objectives. Yay!)
- Smart covers (what are those?)
- Way Points. The brain-hurting stuff governing AI. Tells NPCs or artifacts where to move. Actually, also important to me.
- AI Map. Huge surface that covers most of the level. Tells NPCs where they are able to move (as opposed to the previous category). Hey, I was right after all!
(Another stellar performance of the Random Number God gives us Sektor Gaza's Dopilsya. Brought to you by the Spetznaz goons from Rock&Rolla, and an awesome stalker song if there's ever been one.)
(ASSUMING CONTROL OF THIS TUTORIAL. *BLAM* Go fuck yourself elsewhere, Harbinger!)
*AHEM* Back on track! Now, to look at the Editing toolbar. A critical part of any SDK.
 |
| "Fraggin' rookies. Don't they teach 'em nuthin' in codin' skool these days?" "We've got a codin' skool? 'ow long's that been goin' on then, boss?" *KUFF* |
From left to right:
- Undo - Typical. CTRL+Z. (I've been wanting to get a T-shirt with that command for ages.)
- Redo - Again, vanilla stuff. CTRL+Y.
- Select - Use this to click on things and, um, select them. (You need to select stuff before you can move or edit it.)
- Add - You use this after selecting an object in the bottom right, then clicking somewhere in the level to add it.
- Move - Move things around, as long as they are selected in the Edit Mode box.
- Rotate - As above, but for, um, rotation.
- Scale - Again, as above, but for enlargifying or smallifying stuff.
- Lock to X - Locks the object to the X-axis - you can only move or rotate it on that axis.
- Lock to Y - Same as before, but on the Y-axis.
- Lock to Z - Three guesses, the first two don't count.
- Lock to Z/X - Now this one's funny, you can only drag things along with this turned on. Kind of like a 'lock to terrain' button according to Beacon's tutorial.
Now, this is funny. I've been trying to select anomalies or what I think to be artifact spawn points, but somehow I can't. I either end up picking trees or the landscape. Great. Where am I screwing up?
I can't find the answer here, so it's time to return to 2C.LiryC's tutorial.
But that's for the next post.
It's coming right up, but I want to keep things somewhat organized, here.
No comments:
Post a Comment