Thursday 12 May 2016

Session three: Basics of creating basic spawns

Now, where were we... oh, alright.

Trying to figure out our way around this Rubik cube of an editor.

I guess I shouldn't complain. TecnoBacon put together Stalkersoup without having this.

I find myself having a really hard time focusing, but on to the task at hand.

The task being, getting started with putting together our first on-demand artifact spawning point.

RTFM here in case you find yourself lost in my craze.

Sooooo... Open editor, done. Load the map I want to edit, done.

First things first. With first here being, spot selection.

So... let's see how far can I push this thing without forcing it to crash.

No such luck.
For further info: this is the underpass next to the abandoned rail car right after you leave the rookie village at the Cordon.

One thing I liked about Shadow of Chernobyl is how you could get artifacts randomly out of any anomaly out there. I aim to replicate that, even if it's a pain in the rear.

So, with the spot selected, on to the next step. Add the anomaly spot.

Quoted verbatim for clarity <turns off craze for a minute>:

"The 'anomaly_spot' is a 'space_restrictor' in the Spawn Element section which will create references for all what follows."
"It determines the spot itself, its type and what the player will see in the PDA."

<turns craze back on> Oh, great. I had hoped to skip the whole PDA part. I'm going to end up with a lot of white zones on top of each other.

"But this 'space_restrictor' needs to be attached to a shape, so let's create this shape first."

Well, create a shape, huh? How hard it can be?

<refers to previous post>

<checks 2C's tutorial>

Okay, got this. First, you need to turn on the 'Shape' perspective.

Just like this. See?
Next, tap on the 'Sphere' thingy on the lower right panel.

Ain't many 'Sphere' things to go around.

Next, tap on the 'Add' button on the edition bar. Yeah, the one from the previous post. Go and check. I'll wait.

Why a teapot, I wonder?
(Is it a teapot, to begin with?)

And, finally, place it!

HOORAY!
Well, not so fast. We just placed a shape. Now, on to put that space restrictor thingy on place.

<refers to 2C's tutorial>

Ohhh-kay... now we have to switch to the Spawn Element perspective.

Now you see me...

Same logic, I guess... I mean, pick something from the list, then tap 'Add', and then create item, yes?

My amazing powers of observation did it again.
Teapot magic!
Now, this thing must have a relevant name here and some properties 'in the custom data'. Where is this custom data we have to take care of?

I guess I don't get any points for subtlety.

I call it Vera.
Also, click OK if you don't want the editor to have an episode of amnesia.
Like a certain stalker.
Okay, according to this guide, we're about... no, not a chance we're even halfway there. Hold your horses.

Now we're supposed to attach this thing to a shape... Didn't we just make one?

Now, I guess you click here to start attaching...

And then on the shape... and you get... this. Yay, I guess?
Now, regrettably, I have to call it quits for a while. Duty calls. The joys of being a wage slave.

<Day passes>

Man, I'm tired. Krav Maga is exhausting. I should be getting a shower right now but this unfinished thing really nags at me.

So here I go.

<Turns on Music Bee, loads Dopilsya by Sektor Gaza>

Now, where were we... <checks 2C.Liryc's tutorial>... Oh yeah, now we should be adding anomalies to our anomalous field. I mean, that's where artifacts spawn. Right?

I would like to see if the anomalies nearby could somehow be attached to our new field.

First, I suppose I need to see what kind of stuff I'm working with...

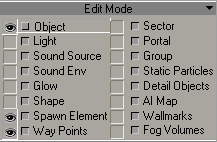
"Spoon... uh... 'Spawn' Element fings, boss."
<Now isn't this one hell of a coincidence. The Random Number God has seen fit to take me straight into the Brain Scorcher bunker by playing MoozE's Tunnels. *looks around nervously for bloodsuckers*>

So, Spawn Element perspective is on. I'm supposed to find the anomaly objects here... but where?

"Stupid *nngh* ring... Fellowship my ass... Ahh, there it is"
Now, notice that list.

  • Some are listed with the 'field' prefix (e.g. 'field_acidic_strong,' 'field_psychic_weak'); I suppose these are the 'auras' causing damage whenever you enter some anomalous fields (the Circus and the Iron Forest in Zaton come to mind). I'm not planning to turn CoC into Misery (however awesome that would be, it's beyond my skills yet) so I skip those.
  • Another common prefix is 'mine'. As in, landmines. You get close, they trigger. Painful. Rings a bell, right? This is what I'm after.
So, a serving of chicken pie later, it's teapot time: what to add?

I'm feeling merciful.

Nah. Just kidding.

2C goes on to say anomalies can be set to turn on and off at random, or to do so at particular times. I guess that's how you make the infamous Electro-plagued tunnel from Shadow of Chernobyl. I'm not going to delve into that now... or yes, maybe I will. Just with one.

Not only this anomaly is borked, it's borked in an unpredictable way.
I guess.
Going back to that particular step, I notice 2C says the 'Shift time' parameter is important if you want to build sequential or random fields, but does not elaborate any further on this.

Now, on to step 4: adding way points. What for? Well, the little treasures every stalker is after don't move randomly inside the anomaly, there is a pattern to it.

So, in order to create the way points, we have to (drumroll) switch to the Way Point perspective.

Like this, I suppose.

So now all sorts of little green markers and lines between them pop up. One of those lines goes right through one of the anomalies I just placed... so I'll move the anomaly. Just in case.

Better safe than sorry. Right?
With that (potential) kink ironed out, on to our next step. We have to... um... <checks 2C's guide>... switch to something called 'Way Mode'.

Not getting points for attention to detail, either.
Next, create a node... oh, so it's teapot time. That's lack of habit for you.

And, since we're at it, we should give it a proper name. One with the same base name than the anomaly spot, 2C says. You usually add a suffix in the likes of "af_way" to recognize it easily.

Note to self: shorter names next time.
Okay, now we're supposed to switch to Point Mode.

The only such thing I could find, so I suppose this is it.

While you're on Point Mode, any successive way points you create will be linked.

Oh, when you want to close the 'loop', so to speak, make sure you're in Select mode (remember? That command in the editing toolbar I discussed on the previous session... go take a look, I'll wait), then hold CTRL to select the two points you want to link up, and click on 'Create 1-Link'.

Just so.
So, we're done with this!

I think I overdid it a little...

Okay, what's next? <checks 2C's tutorial>

Oh yeah, the whole point of this entire exercise: adding the place where the artifacts themselves will be spawned. At last.

<The Random Number God is at it again: now listening to Jesse Allen's Lo Fi Epic. Gods, if only I could visit Omega sometime. Or not. The place is the Mass Effect version of Nar Shaddaa.>

It's a good idea to place the anomal_zone (that's the name of the thingy we're creating now) slightly above ground to avoid the artifact spawning under the terrain. I hate when that happens... *groans*

But... where is it?

"Ahh, there it is"

Wait, I see a pattern here...
My powers of observation never cease to amaze me: an object's name -and the folder where you'll find it- will be listed together next to the 'Profile (spawn section)' label.

Now it's so obvious I want to kick myself, but good thing I found out.

Now, we must tell the game where to look for the LTX file governing this anomalous field.

<scribbles down file name on a piece of paper>
Now, to create it. This is fairly standard stuff, so I'm quoting it almost verbatim:

  • In the SDK folder, go to gamedata\configs\scripts\edited_map_name\anomaly.
  • Create here a new LTX file with the same name as in your anomal_zone Custom data.
    • You can use an existing one to modify it to your needs but don't forget to save it with its new name and in the proper folder,
Since I'm a greedy bastard, this anomaly won't spawn anything right from the start... though, come to think of it, if I go ahead with this I won't know if all of this worked properly. So let's have it spawn something.

And done. Behold my works, ye mighty, and despair:


[anomal_zone]

field_name = esc_tuto_anom_misaligned_scav_vera

layers_count = 1

respawn_tries = 4

max_artefacts = 1

applying_force_xz = 200

start_artefact = af_medusa

artefacts = af_medusa, af_cristall_flower, af_night_star, af_vyvert, af_gravi, af_gold_fish

coeff = 3, 3, 2, 2, 1, 1

artefact_ways = esc_tuto_anom_misaligned_scav_vera_af_way


Alright... so, next step would be to make this place visible in the PDA... wait, so you can make the place but it's not compulsory to show it? Yay!

Oh well, for the sake of completeness, here we go. I can undo it later.
  1. Go to gamedata\scripts\ and open pda.script.
  2. Add the anomaly_spot to the PDA by adding such kind of line in the local_primary_objects_tbl section (around line 213)
  3. Then, give it a name by adding a new string in the st_land_names.xml (in configs\text\eng)
Now it's (drumroll) compiling time!

Back in the Level Editor, go to Compile, and click Make Game (AND ONLY THAT!)

Here goes nothing...
Now, let's leave the Level Editor and go to the folder where it's in.

Look for a file called '3_xrAI_allspawn.bat'.

Run it.

Cross your fingers.

Oh, and don't rush things. It takes a while.

11b grats
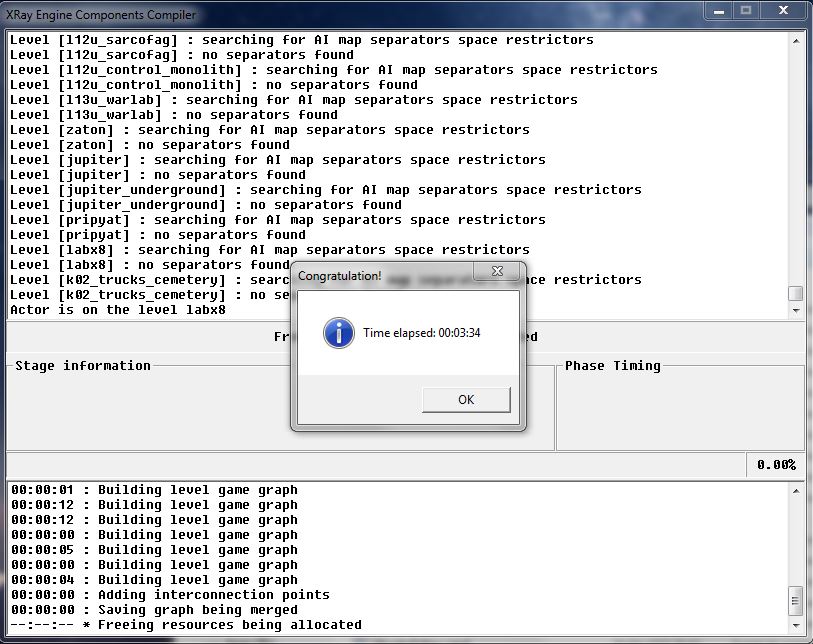
Only 3:34? My poor rig needed twice that time...
So what is the end product of this little magic dance?

A .spawn file. In case it has a weird name of sorts, remember to rename it to 'all.spawn'.

Next step is to grab this file from the level editor's gamedata\spawns folder and paste it elsewhere.

On CoC's gaming\testing folder.

(Where is this folder to begin with?!)

Okay, I can't find it... so I go and unpack everything to try and match the file structure. 

This is supposed to go into the gamedata\spawns folder. I place it there.

I run the game.

Start a new game...

...and it crashes.

Fuming with anger, I remove the all.spawn file I just made from the spawns directory.

Start it again...

...and it runs.

Just great.

Predictably, I went almost mad with rage.

After I managed to cool down a bit, I went back to the Epicstalker forums, where I had posted a request for help, and I was surprised to notice that I had gotten some answers.

One of them posted by none other than the author of the tutorial I'm using as guidance.

So I seized the opportunity and reached out to him for help.

It turned out to be I was missing a last step.

I need to copy the relevant LTX files to the matching directory on the CoC installation directory.

Since I was editing the Cordon, then the right directory would be: gamedata\configs\scripts\escape\anomaly\ .

So I grab the LTX file I made and pasted it there...

Gave it another try...

And it works!

JOY!

Next objective: I want to bring in the artifacts from Lost Alpha or Stalkersoup.

A HUGE THANK YOU to 2C.LiryC for both creating this tutorial and for providing support.

Monday 9 May 2016

Session two: SDK basics

So.

Time for round two.

It's taken some high and mighty time for me to do this. Blame it on being alternatively focused on my ongoing New World of Darkness chronicle (now featuring: Magi!) and a project to build an Android app for running said chronicle.

But the Zone beckons... How many of you fellow Stalkers have had dreams about it?

Again, I digress. Let's get started, shall we?

My previous (and first) post saw me undergoing all the steps to get the level editor up and running with all the Call of Chernobyl assets, so we're starting from there.

So, how do you use this thing?

Empty editor window. Funny. I'm not going to get much modding done this way.

I figure, we have to load up something to edit in the first place.

(While I'm taking screenshots, Yuki Kajiura's Terror Adherens comes up randomly on my playlist. Foretelling how badly I'm going to screw up, perhaps?)

To load a map, look up the 'File' label on the right-side panel, left-click on it, and an unfolding menu should appear. Then, left click on the 'Open' label.

Just so.

This spawns your run-of-the-mill Open File dialog. In my case, I went looking for the stuff in the editors -> rawdata -> levels folder.

"Dat 'dialog' fing oughta look like dis 'un, boss."

(I just spent 10 minutes trying to figure out how to type these stupid arrow characters in Unicode and realized I have to reboot my PC. Screw it. Goddamn Microsoft, if it wasn't for the games I'd have migrated to Linux or OS X ages ago.)

As you have noticed, I went and picked '01_escape' as our level, which is the file for the Cordon.

So, barring something unexpected happening (and doesn't it ever) after you load the file you should get this. (I got an error of some sort right before it finished loading, but I just clicked 'continue', and indeed it continued.)

"Um, yeah, dat's how one o' dem 'anomaly' gubbinz be lookin' like, boss."

Ooooookay... this looks nice... but what do I do now? This is nothing at all like Android Studio.

Time to RTFM.

And the manual in question, or the beginning of it at least, is available at the Wormwood development team page over at moddb.com.

(Now miss Kajiura graces my ears with Salve, terrae magicae. Fitting. And ironic, considering how similarly horrible the world of the Puella Magi and their witch enemies is in regards to the Zone.)

Those guys are skilled through and through. They really put together a gorgeous tutorial, nothing like this learning journal of sorts.

Okay. Number 1, what is it. Already talked this one through.

Number 2, download and setup. Already talked this one one through, too.

Number 3, setting up the level converter. Ditto.

Number 4, using the level converter... actually this is talking about something different. Nope, we didn't set up the level converter after all.

I don't even have it. Gorgeous. Well, this is easily remedied.

Okay... whoa, this stuff is ancient. It hearkens back to the prehistoric days of 2011.

Unpacked it... this is actually pretty small stuff. And this is apparently limited to CoP levels only. Limited in scope, this. So I skip it.

On to step 5: The Level Editor.

Now this is the first juicy bit: how do we move about.

Quoting verbatim:

  • Shift-LMB combined with mouse movement will move the view forward, backward, left, right etc.
  • Shift-RMB combined with mouse movement will move the view up and down vertically.
  • Shift-LMB+RMB combined with mouse movement will change the view as if you were in an FPS, allowing you to look around.
Now, occasionally, doing this will spawn a small dialog window in this fashion. Don't let it scare you. To avoid it, simply keep your POV in a look-down perspective. Turning the screen around to look at the horizon stands a greater chance of causing this.

"Boss! Dis be lookin' all red'"
"Red? Good! Red wunz go fasta!"

(The Random Number God decides to feature ClariS' Luminous. Hail Madokami.)

Okay now. Loading Maps... well, I just did this. Moving on.

Whoa, now this is interesting. Editing maps.

"Wot da zog be dem gubbinz?"


This little window is featured on the middle-right of the screen. Lots of strange things here.

These thingies let you pick what you want to see at any given moment.

The eye icons to the left of each selection show (drums roll) the visible components of the map. So I guess when these eyes aren't there, I can't see those parts. Wow.

By default my own editor had everything turned on, so I go ahead and turn off the stuff that is listed as off in this window. Most noticeable is the change effected by turning off the AI map: all those 4-arrow icons vanish. I suspect they denote areas through which the AI may move. (Astounding discovery, that. My genius is unmatched.)

Sure thing.

Actually there is a pretty slick feature here: immediately next to the 'eye' checkbox, we have another, smaller checkbox, which has to be ticked in order for us to edit components of that kind. This prevents accidentally screwing up.

Which means, my chances of success just skyrocketed.

(Hey, a proper stalker's song for a change! Kino's Spokoynaya Noch. Tsoi lives!)

Okay... this dude gives a brief rundown of the important things you can actually see or edit here. Again, I quote:

  • Objects. Most stuff. Landscape, buildings, etc. They are all large models that combine together. Like large jigsaw pieces after a fashion. Turning this on will let you select them. Also used to add or edit smaller objects on the level. The dude who wrote this mentions vehicles as an example.
  • Spawn Element. Everything from items in the level to smart terrains. Things spawned into the game come under this, so you can add or edit stuff on the level such as:
    • Small items ("Anuvver gun fer yer pile, boss!")
    • Anomalies (one of my objectives. Yay!)
    • Smart covers (what are those?)
  • Way Points. The brain-hurting stuff governing AI. Tells NPCs or artifacts where to move. Actually, also important to me.
  • AI Map. Huge surface that covers most of the level. Tells NPCs where they are able to move (as opposed to the previous category). Hey, I was right after all!
(Another stellar performance of the Random Number God gives us Sektor Gaza's Dopilsya. Brought to you by the Spetznaz goons from Rock&Rolla, and an awesome stalker song if there's ever been one.)

(ASSUMING CONTROL OF THIS TUTORIAL. *BLAM* Go fuck yourself elsewhere, Harbinger!)

*AHEM* Back on track! Now, to look at the Editing toolbar. A critical part of any SDK.

"Fraggin' rookies. Don't they teach 'em nuthin' in codin' skool these days?"
"We've got a codin' skool? 'ow long's that been goin' on then, boss?" *KUFF*
From left to right:
  • Undo - Typical. CTRL+Z. (I've been wanting to get a T-shirt with that command for ages.)
  • Redo - Again, vanilla stuff. CTRL+Y. 
  • Select - Use this to click on things and, um, select them. (You need to select stuff before you can move or edit it.)
  • Add - You use this after selecting an object in the bottom right, then clicking somewhere in the level to add it.
  • Move - Move things around, as long as they are selected in the Edit Mode box.
  • Rotate - As above, but for, um, rotation.
  • Scale - Again, as above, but for enlargifying or smallifying stuff.
  • Lock to X - Locks the object to the X-axis - you can only move or rotate it on that axis.
  • Lock to Y - Same as before, but on the Y-axis.
  • Lock to Z - Three guesses, the first two don't count.
  • Lock to Z/X - Now this one's funny, you can only drag things along with this turned on. Kind of like a 'lock to terrain' button according to Beacon's tutorial.
Now, this is funny. I've been trying to select anomalies or what I think to be artifact spawn points, but somehow I can't. I either end up picking trees or the landscape. Great. Where am I screwing up?

I can't find the answer here, so it's time to return to 2C.LiryC's tutorial.

But that's for the next post. 

It's coming right up, but I want to keep things somewhat organized, here.

Tuesday 19 April 2016

Session one: getting started

Alright. Ahem. First post, or something.

Long story short.

I have the Strugatsky brothers to blame.

Especially, one particular tale of theirs called Forgotten Experiment.

Last time I checked, it has not been translated into English. I actually got my hands on it via a compilation of Soviet sci-fi tales published in Spanish, Lo mejor de la ciencia ficción rusa. Which was okay, since Spanish is my mother tongue.

(And I only knew the barest of basics of English then. I was nine years old. Go figure what a tale about something that matches the premise of the Zone to the letter can do to so young a brain.)

That book was never far. I remember re-reading parts of it now and then.

Then, come 2007 or something, I came across the game we all know and love. Shadow of freakin' Chernobyl.

Nothing short of an earthquake would rock my life like that.

I became an on-again, off-again lurker under several aliases. Even penned a fiction available both at the official GSC forums and fanfiction.net.

But I never went far into the modding scene. (I never went close, either.) Asides from doing some LTX editing, I didn't explore much.

I'm more of a writer than of a coder, I guess.

But this time I actually got the tools, and started looking around, and actually looked for instructions and hacks as I usually do when I code for realz.

(I got into the coding biz and took up the study of Russian because I wanted to join the guys over at GSC. Yeah, start laughing. I did get a -wonderful- wife out of it all. Someday I should make a blog post out of the story.)

So, I guess this is it.

I thought this blog would serve both to document my progress and to spur me further on. And also as a guide of sorts for people to try their hand at it, if I ever get far.

So, where do you start? What do you need? I suppose being exposed to code for a few hundred hours won't hurt.

In my case, I'm a mobile dev. Android specialist, actually. Has as much to do with S.T.A.L.K.E.R. as dolls with aircraft engines, but you gotta begin somewhere.

But I digress.

My starting point was coming across a tutorial by 2C.LiryC about Creating basic spawns, how to and requirements.

Actually, nope. My starting point was the following question while playing the -amazing- Call of Chernobyl mod: "if stalkers come to the Zone to hunt for artifacts, how come there are so few to be found?"

(That's probably a design decision on TeamEPIC's part. After all, there are only so many artifacts to go by.)

Then I went on to ramble on Reddit about it. Having some limited game design experience, I had initially guessed that editing some LTX could do something about that.

Well, tough luck. Maybe you can, but to create the places for the damn little thingies to spawn, you need the SDK. That much was clear from my first glance at the tutorial.

Alright, this is embarrassing. FIRST step: CoP SDK.

I wrote the whole part about the CoC files required, then I had a hunch and rechecked the links.

Served me right. None of that stuff is about the CoP SDK, which is of course the absolute basis of anything I'm going to do.

This is easily found, though. Google around and you find this: X-Ray 1.6 Engine SDK v0.7.

Small-ish download, so it should not be too hard to get your irradiated, calloused hands on it.

Sooooo... first second step. Quote: 'up to date CoC SDK'. 

I remember posting a question on the TeamEPIC forums asking what did I need. Checked a couple of times, but no replies. Guess I had it coming for being a lazy bastard.

Actually, I had it coming twice fold. The damn links are on the same page where I got CoC in the first place. 

Doubly ashamed now, but hey. I'm only human. Laziness is probably part of the job description.

Another condition I learned about humanity: we're a bunch of selfish pricks - I tried downloading the torrent but I got stuck at around 70% because none of the three seeds was available.

So there, I got at least one valuable pointer for you - don't go for the torrent. I'll repost the links for you here:
Don't you go and screw up your download somehow when leeching off MEGA, though. You have a limited amount of available free bandwidth, consumption of which will pause all your downloads for about five hours. Great.

No problem. I'm a patient guy. Besides, I have this great World of Darkness chronicle to run, I can wait for the stuff to download while I torture my players, I thought.

So I got my files. On the third try.

Actually, while reading carefully the tutorial, I realized I was missing something, a scene update. I know you're a lazy bastard too, but do go and grab it.

And also, RTFM. Or, more properly, RTFT, since 2C's is not a manual but a tutorial. (Close enough, but I'm a stickler for detail.) Even more important now, since I realized I screwed up with a link so I had to go back and add another section. Great.

*Reddens with embarrassment* Okay. SDK: check. CoC files: check. Now: deployment.

This is simple enough. Grab the CoP installer, point it to your location of choice, then let it do its work.

I read somewhere it's best not to install it on your C:\ drive. If I ever find the link to the source, I'll post it here. I went ahead and installed it elsewhere, just to be sure.

Next, grab that humongous compressed file you leeched off MEGA or Google Drive and unzip it right on the same folder where you installed the CoP SDK.

Yeah, you should merge both the 'editors' folder the CoP SDK installer creates and the one packaged into that 7z file.

Then go ahead and do the same with the scene update stuff.

Then, supposing you have no complications at all (a happy state of affairs, that is), opening that 'editors' folder and running !LevelEditor.cmd should result in this:


It does? Hooray! It works!